email

Real Estate Email Marketing Reports

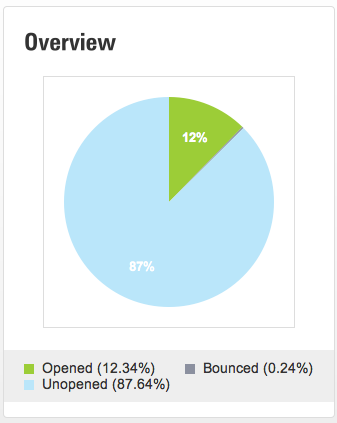
What do all of those terms in my email marketing reports mean?

Opened – The number of unique people that opened an email at least once.  Even though they may have opened the email more than once they are still only counted once.
Unopened – The number of emails that were not opened.

Bounce – An email that was unable to be delivered because of an issue with the email address. i.e. bad email address, miss- spelled name, domain is expired etc…

Delivered – The number of emails that were delivered.

Total Opens – The total number of times the email has been viewed.  Each time the subscriber opens the email is counted.

Clicks – The total number of times a link in the email has been clicked.

Unique Clicks – The number of times links in the email have been clicked.  If a subscriber clicked on a link more than once it is only counted once.

Forwards – The total number of times that the email was forwarded using the “Forward” feature link in the email.

Opt Outs – The number of people that opted out/unsubscribed from your list using a the link in this campaign.

Feel free to contact us if we missed any terms.

Tagged , , ,

How to Create a Real Estate Email Marketing Campaign

Email Marketing is an important part of any Real Estate Marketing Plan and one of the features included in the Digital Home Info Real Estate Marketing Platform.  Many of our customers are eager to get started using this great feature but aren’t quite sure where to get started.  So we created this tutorial to show you how to create an Email Marketing Campaign using the Digital Home Info system.

1) Once Logged in to the Digital Home Info Portal hover over the “Email Marketing” tab in the top navigation bar.

Real Estate Email Marketing

2) Click on the “New Campaign” link in the drop down menu.

3) Select an Email Subscriber List from the available lists.  Press the “Next” button at the bottom of the screen. (Don’t have a list created yet? Click here to create an email marketing list)

Real Estate Email List

4) Enter a Campaign Name, Subject Line and Select a Date and Time to deliver the email.  Press the “Next” button to go to the template selection screen.

Real Estate Email Campaign

5) Select an Email Template to use.  You can select from the provided templates or add a custom template and use it.  Press the “Next” button to go to the Email Editor.

Real Estate Email Template

6) Edit the default content in the email template by typing over it or using the photo gallery to add your images.  Click on the “Next” button to go to the “Text Only” version of your email.

Real Estate Marketing Email

7) This is a “Text Only” version of your email.  It is for email clients that do not show html email.  The text only version includes all of the content in the html email and tries to format it in an easy to read format. When you are done editing this press the “Next” button to go to the Campaign Review page.

Real Estate Marketing Email

8) On the Campaign Review Page you can review the settings for this campaign.  Click on the “Edit” button next to each section in order to change the information.  You can also preview the HTML and Text versions of the email by pressing the “Preview” button.  Enter an email address to send a test/preview of the email. You must send a test/preview email before being allowed to actually schedule the email.

Real Estate Email Marketing Preview

9) Once you have reviewed the test/preview email you press the “Schedule Email” button to send your email. Once an email is scheduled it may be modified from the “Pending” section at any time up until it is actually delivered.

Real Estate Marketing Email Review

Feel free to let us know if you have any questions.


Tagged , ,